
This is the legacy 4D documentation web site. Documentations are progressively being moved to developer.4d.com
- 4D Language Reference
-
- Drag and Drop
-
-
 Drag and Drop
-
On Drop Database Method
-
 Drop position
-
SET DRAG ICON
-
Drag and Drop
4D allows built-in drag and drop capability between objects in your forms and applications. You can drag and drop one object to another, in the same window or in another window. In other words, drag and drop can be performed within a process or from one process to another.
You can also drag and drop objects between 4D forms and other applications, and vice versa. For example, it is possible to drag and drop a PNG picture file onto a 4D picture field. It is also possible to select text in a word processing application and drop it onto a 4D text variable or a list box.
Finally, it is possible to drop objects directly onto the application without necessarily having a form in the foreground. The On Drop Database Method can be used to manage the drag and drop action in this case. This means, for example, that you can open a 4D Write Pro document by dropping it onto the 4D application icon. This specific implementation is described in the On Drop Database Method page.
4D provides two drag-and-drop modes:
- a custom mode, where the whole drag-and-drop operation is handled by the programmer. This mode lets you implement any interface based upon drag-on-drop, including interfaces that do not necessarily transport data, but can perform any action like opening files or triggering a calculation. This mode is based upon a combination of specific properties, events, and commands from the “Pasteboard” theme.
- an automatic mode, where a drag-and-drop operation automatically copies or moves data from an object to another. This mode is available to text-based objects and (partially) pictures, and can be enabled by simply checking a property. This mode is detailed in the Automatic Drag and Drop section below.
Implementing a custom drag-and-drop interface means combining properties, events, and usually commands from the “Pasteboard” theme. The following diagram illustrates the key points of a custom drag-and-drop sequence:
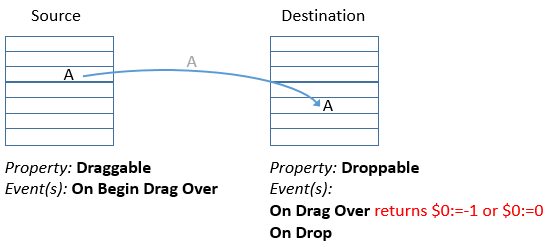
Your implementation will be based upon the following scenario:
- In the On Begin Drag Over event of the source object (with "Draggable" property), put appropriate data in the pasteboard using APPEND DATA TO PASTEBOARD, SET FILE TO PASTEBOARD or other commands from the Pasteboard theme. You can also define a specific cursor icon using SET DRAG ICON command.
- In the On Drag Over event of the destination object (with "Droppable" property), get the data types or data signatures found in the pasteboard using GET PASTEBOARD DATA TYPE or GET PASTEBOARD DATA and check if they are compatible with the destination object.
The Drop position command returns the element number or the item position of the target element or list item, if the destination object is an array (i.e., scrollable area), a hierarchical list, a text or a combo box, as well as the column number if the object is a list box.
If the destination object or element is compatible, return 0 in $0 to accept the drop, otherwise return -1 in $0. - In the On Drop event of the destination object (with "Droppable" property), execute any action in response to the drop. If the drag-and-drop operation is intended to copy the dragged data, you simply assign the data to destination object. If the drag and drop is not intended to move data, but is instead a user interface metaphor for a particular operation, you can perform whatever you want, for example getting file paths using Get file from pasteboard command.
All these properties and events are detailed below.
To drag and drop an object to another object, you must select the Draggable property for that object in the Property List window. In a drag-and-drop operation, the object that you drag is the source object.
To make an object the destination of a drag and drop operation, you must select the Droppable property for that object in the Property List window. In a drag-and-drop operation, the object that receives data is the destination object.
Note: Automatic Drag and Automatic Drop additional properties are available for text fields and variables as well as for combo boxes and list boxes. The Automatic Drop option is also available for picture fields and variables. They are used to enable the automatic drag and drop mode based on copying the contents (the drag and drop action is no longer managed by 4D form events). Please refer to the Automatic Drag and Drop paragraph at the end of this section.
By default, newly created objects can be neither dragged nor dropped. It is up to you to set these properties.
All objects in an input or dialog form can be made to be dragged and dropped. Individual elements of an array (i.e., scrollable area), items of a hierarchical list or rows in a list box can be dragged and dropped. Conversely, you can drag and drop an object onto an individual element of an array or an item of a hierarchical list or a list box row. However, you cannot drag and drop objects from the detail area of an output form.
You can also manage dragging and dropping onto the application, outside of any form, using the On Drop Database Method.
You can easily create a drag-and-drop user interface, because 4D allows you to use any type of active object (field or variable) as source or destination objects. For example, you can drag and drop a button.
Notes:
- To drag a text or a button labeled "draggable," you must first press the Alt (Windows) or Option (macOS) keys.
- By default, in the case of picture fields and variables, the picture and its reference are both dragged. If you only want to drag the reference of the variable or field, first hold down the Alt (Windows) or Option (macOS) key.
- When the “Draggable” and “Movable Rows” properties are both set for a List box object, the “Movable Rows” property takes priority when a row is moved. Dragging is not possible in this case.
An object that is capable of being both dragged and dropped can also be dropped onto itself, unless you reject the operation. For details, see the discussion below.
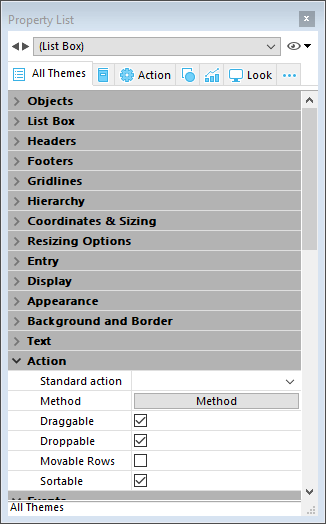
The following figure shows the Property List window with the Droppable and Draggable properties set for the selected object:
Management of drag and drop by programming is based on three form events: On Begin Drag Over, On Drag Over and On Drop.
Note that the On Begin Drag Over event is generated in the context of the source object of the drag while On Drag Over and On Drop are only sent to the destination object.
In order for the application to process these events, they must be selected in an appropriate manner in the Property List for both the source and destination objects:
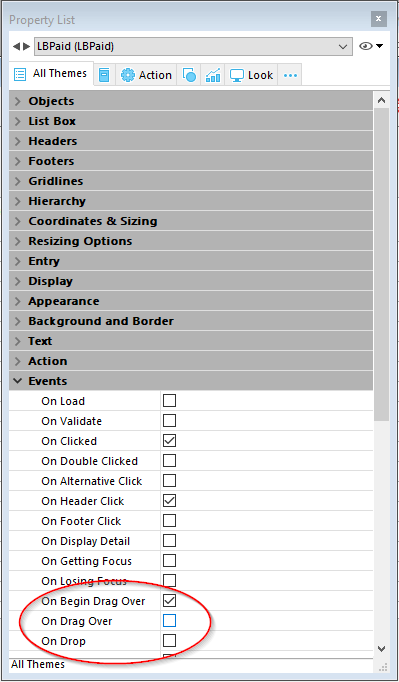
The On Begin Drag Over form event can be selected for any form objects that can be dragged. It is generated in every case where the object has the Draggable property. It can be called from the method of the source object or the form method of the source object.
Note: Unlike the On Drag Over form event, On Begin Drag Over is called within the context of the source object of the drag action.
The On Begin Drag Over event is useful for preparing of the drag action. It can be used to:
- Add data and signatures to the pasteboard (via the APPEND DATA TO PASTEBOARD command).
- Use a custom icon during the drag action (via the SET DRAG ICON command).
- Accept or refuse dragging via $0 in the method of the dragged object. To indicate that drag actions are accepted, the method of the source object must return 0 (zero); you must therefore execute $0:=0. To indicate that drag actions are refused, the method of the source object must return -1 (minus one); you must therefore execute $0:=-1. If no result is returned, 4D considers that drag actions are accepted.
4D data are put in the pasteboard before calling the event. For example, in the case of dragging without the Automatic Drag action, the dragged text is already in the pasteboard when the event is called.
The On Drag Over event is repeatedly sent to the destination object when the mouse pointer is moved over the object. In response to this event, you usually:
- Get the data and signatures found in the pasteboard (via the GET PASTEBOARD DATA command).
- Depending on the nature and type of data in the pasteboard, you accept or reject the drag and drop.
To accept the drag, the destination object method must return 0 (zero), so you write $0:=0. To reject the drag, the object method must return -1 (minus one), so you write $0:=-1. During an On Drag Over event, 4D treats the object method as a function. If no result is returned, 4D assumes that the drag is accepted.
If you accept the drag, the destination object is highlighted. If you reject the drag, the destination is not highlighted. Accepting the drag does not mean that the dragged data is going to be inserted into the destination object. It only means that if the mouse button was released at this point, the destination object would accept the dragged data and the On Drop event would be fired.
If you do not process the On Drag Over event for a droppable object, that object will be highlighted for all drag over operations, no matter what the nature and type of the dragged data.
The On Drag Over event is the means by which you control the first phase of a drag-and-drop operation. Not only can you test whether the dragged data is of a type compatible with the destination object, and then accept or reject the drag; you can simultaneously notify the user of this fact, because 4D highlights (or not) the destination object, based on your decision.
The code handling an On Drag Over event should be short and execute quickly, because that event is sent repeatedly to the current destination object, due to the movements of the mouse.
The On Drop event is sent once to the destination object when the mouse pointer is released over the object. This event is the second phase of the drag-and-drop operation, in which you perform an operation in response to the user action.
This event is not sent to the object if the drag was not accepted during the On Drag Over events. If you process the On Drag Over event for an object and reject a drag, the On Drop event does not occur. Thus, if during the On Drag Over event you have tested the data type compatibility between the source and destination objects and have accepted a possible drop, you do not need to re-test the data during the On Drop. You already know that the data is suitable for the destination object.
An interesting aspect of the 4D drag-and-drop implementation is that 4D lets you do whatever you want. Examples:
- If a hierarchical list item is dropped over a text field, you can insert the text of the list item at the beginning, at the end, or in the middle of the text field.
- Your form contains a two-state picture button, which could represent an empty or full trash can. Dropping an object onto that button could mean (from the user interface standpoint) “delete the object that has been dragged and dropped into the trash can.” Here, the drag and drop does not transport data from one point to another; instead, it performs an action.
- Dragging an array element from a floating window to an object in a form could mean “in this window, show the Customer record whose name you just dragged and dropped from the floating window listing the Customers stored in the database.”
- And so on.
So, the 4D drag-and-drop interface is a framework which enables you to implement any user interface metaphor you may devise.
Text areas (fields, variables, combo boxes and List boxes) as well as picture objects allow the automatic drag and drop, which is the movement or copy of a text or picture selection from one area to another by a single click. It can be used in the same 4D area, between two 4D areas, or between 4D and another application, for example WordPad.
Note: In the case of automatic drag and drop between two 4D areas, the data are moved, in other words, they are removed from the source area. If you want to copy the data, hold down the Ctrl (Windows) or Option (OS X) key during the action (under OS X, you need to hit the Option key after you start to drag the item(s)).
Automatic drag and drop can be configured separately for each form object via two options of the Property List: Automatic Drag and Automatic Drop: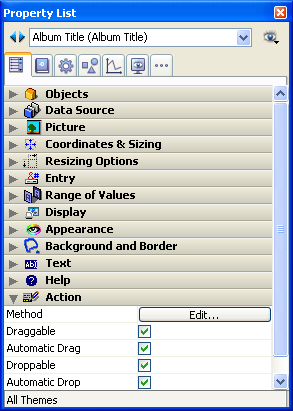
- Automatic Drag (Text type objects only): When this option is checked, the automatic drag mode is activated for the object. In this mode, the On Begin Drag form event is NOT generated.
If you want to “force” the use of the standard drag while automatic drag is enabled, hold down the Alt (Windows) or Option (Mac OS) key during the action (under OS X, you need to hit the Option key before you start to drag the item(s)). This option is not available for pictures.
- Automatic Drop: This option is used to activate the automatic drop mode. In this mode, 4D automatically manages — if possible — the insertion of dragged data of the text or picture type that is dropped onto the object (the data are pasted into the object). The On Drag Over and On Drop form events are not generated in this case. On the other hand, the On After Edit (during a drop) and On Data Change (when the object loses the focus) events are generated.
In the case of data other than text or pictures (another 4D object, file, etc. ) or complex data being dropped, the application refers to the value of the Droppable option: if it is checked, the On Drag Over and On Drop form events are generated; otherwise, the drop is refused. This also depends on the value of the “Prevent drop of data not coming from 4D” option (see below).
Beginning with version 11, 4D allows drag and drop of selections, objects and/or files external to 4D, like picture files for example. This possibility must be supported by the database code.
In databases converted from previous versions of 4D, this possibility may lead to malfunctioning if the existing code is not adapted accordingly. For this reason, an option in the Preferences can be used to disable this function: Prevent drop of data not coming from 4D. This option is found on the Application/Compatibility page. It is checked by default in converted databases.
When this option is check, the drop of external objects into 4D forms is refused. Note however that the insertion of external objects remains possible in objects having the Automatic Drop option, when the application can interpret the dropped data (text or picture).
In this simple example, we want to fill a text area with data dragged from an array-based list box:
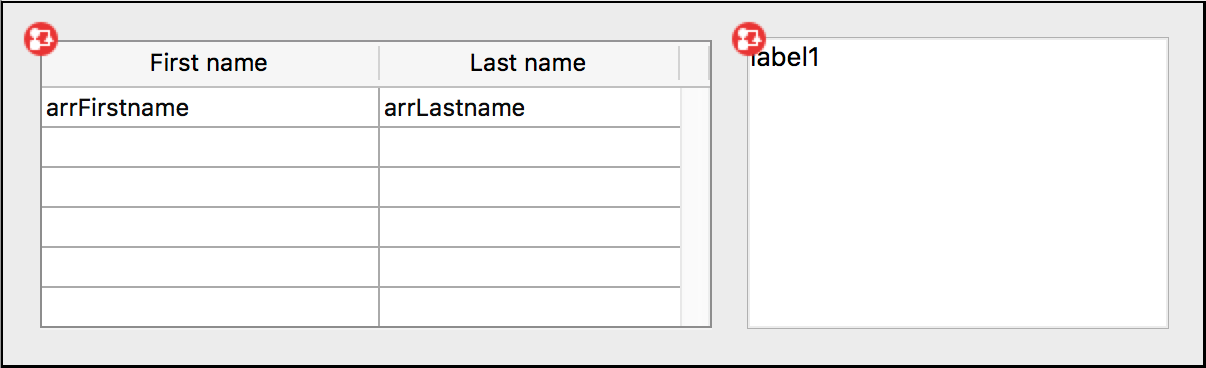
The list box object method contains:
  //Object Method: ListBox

 If(Form event code=On Begin Drag Over)

    SET TEXT TO PASTEBOARD(arrFirstname{arrFirstname}+" "+arrLastname{arrFirstname})

 End if
The text area object method contains:
  // Object Method: label1

 If(Form event code=On Drop) //Requires Droppable Action enabled from Property List

    ARRAY TEXT($signatures_at;0)

    ARRAY TEXT($nativeTypes_at;0)

    ARRAY TEXT($formatNames_at;0)

    GET PASTEBOARD DATA TYPE($signatures_at;$nativeTypes_at;$formatNames_at)

    If(Find in array($signatures_at;"com.4d.private.text.native")#-1) // there is 4D text in pasteboard

       OBJECT Get pointer(Object current)->:=Get text from pasteboard

    End if

End ifCombining custom and automatic drag and drop features allows simple and powerful interfaces. In this example, we want to fill a text area with data dragged from a list box:
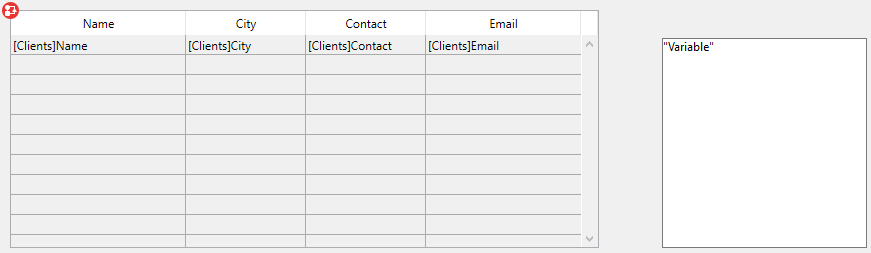
- List box: "Draggable" property and "On Begin Drag Over" event checked
- Text area: "Automatic Drop" property checked.
  //list box object method

 Case of

    :(Form event code=On Begin Drag Over)

       LOAD RECORD([Clients])

       $label:=[Clients]Name+Char(CR ASCII code)+[Clients]Contact+Char(CR ASCII code)+\

       [Clients]Address1+Char(CR ASCII code)+[Clients]City+", "+[Clients]State+" "+[Clients]ZipCode)

       SET TEXT TO PASTEBOARD($label)

 End case
Moving and formatting data is done through drag and drop:

You want the user to select a file on the disk, then drag and drop it on an enterable variable (of type object) so that it displays a json description of the file.

In the object method of the variable, you just write:
 C_LONGINT($0)

 Case of


    :(Form event code=On Drag Over)

  // Accept On Drop event only if the pasteboard contains files, reject otherwise.

       If(Get file from pasteboard(1)="") //no file in pasteboard

          $0:=-1 //reject drop

       End if


    :(Form event code=On Drop) //Requires Droppable action enabled from Property List

       C_TEXT($path_t)

       C_OBJECT(path_o)

       $path_t:=Get file from pasteboard(1)

       If($path_t#"")

          path_o:=Path to object($path_t)

       End if


End caseYou want the user to select files on the disk, then drag and drop them on a list box so that it displays file paths.

In the list box object method, you just write:
 C_LONGINT($0)

 Case of


    :(Form event code=On Drag Over)

  // Accept On Drop event only if the pasteboard contains files, reject otherwise.

       If(Get file from pasteboard(1)#"") //at least one file dropped

          $0:=0 //accept drop

       Else //no file in pasteboard

          $0:=-1 //reject drop

       End if


    :(Form event code=On Drop) //Requires Droppable action enabled from Property List

       ARRAY TEXT(importedPath_at;0)

       C_TEXT($path_t)

       C_LONGINT($index_l)

       $index_l:=1

       Repeat

          $path_t:=Get file from pasteboard($index_l)

          If($path_t#"")

             APPEND TO ARRAY(importedPath_at;$path_t)

          End if

          $index_l:=$index_l+1

       Until($path_t="")

 End case
_o_DRAG AND DROP PROPERTIES
Drop position
Form event code
GET PROCESS VARIABLE
Is a list
RESOLVE POINTER
Type

Product: 4D
Theme: Drag and Drop
4D Language Reference ( 4D v20 R7)


