
This is the legacy 4D documentation web site. Documentations are progressively being moved to developer.4d.com
- 4D Server Reference
-
- Using a remote 4D
-
-
 Connecting to a 4D Server Database
-
Administration from Remote Machines
-
Compilation from Remote Machines
-
Debugging from Remote Machines
-
Connecting to a 4D Server Database
There are three ways to connect to a 4D Server database via a remote 4D:
- Using the connection dialog box
- Using the Open Recent Databases menu
- Using a 4DLink shortcut file containing the access parameters to the database.
To display the 4D Server connection dialog box, first launch the 4D application.
The Open command of the File menu (or the corresponding button in the 4D tool bar) can be used to select the opening mode for the 4D database:
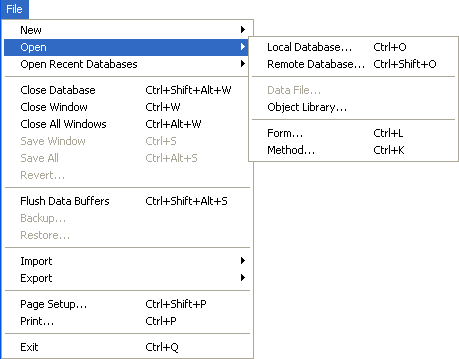
Choose the Open>Remote Database... command
The 4D Server connection dialog box appears. This dialog box has three pages which can be accessed via the following tabs: Recent, Available and Custom:

If you check the Display this dialog at next startup option, this dialog box will automatically be displayed on startup of the 4D application.
Note: You can also display this dialog box by checking on the Connect to 4D Server link in the 4D Welcome dialog box.
This tab memorizes and displays a list of all recently used 4D servers. The list is sorted by alphabetical order. To connect to a server from this list, double-click on its name or select it and click the OK button.
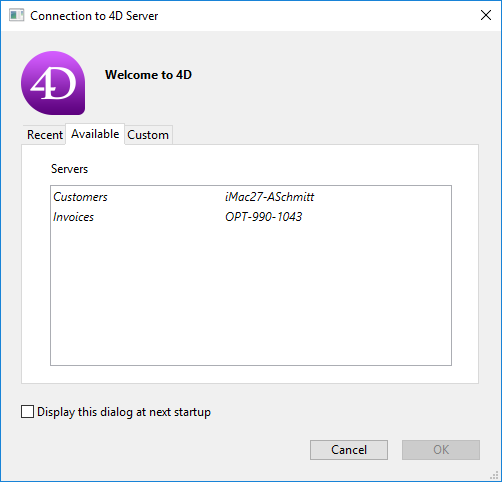
4D Server includes a built-in broadcasting system that automatically displays the name of the 4D Server databases available on the network. These names are listed on the Available tab of the connection dialog box.
The list is sorted by order of appearance and updated dynamically. To connect to a server from this list, double-click on its name or select it and click the OK button.
Notes:
- A circumflex accent (^) is placed before the name of databases published with the encryption option. For more information, refer to section Encrypting Client/Server Connections.
- It is possible to not publish the database name on the network by de-selecting the Publish database at startup option on the server. In this case, connection can only be made manually on the “Custom” tab.
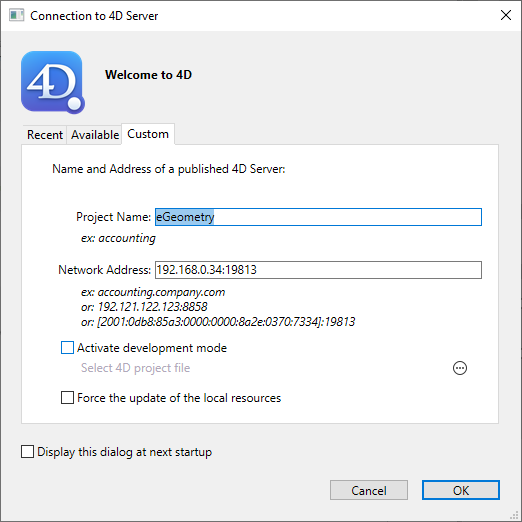
The Custom tab allows you to give a custom name and connect to a specific 4D Server database via its network address. Because 4D Server can be configured so that the name of a database is not automatically published on the network (see Publish database at startup) and thus, does not appear on the "Available" tab, you may need to manually enter its IP address on this tab.
- Database name: allows defining the name of the 4D Server database. This name will be used in the Recent page when referring to the database.
- Network address: allows entering the network address of the machine where the 4D Server was launched. You can enter the domain name (i.e. "mydb.mycompany.com") or the IP address (IPv6 and IPv4 formats are supported).
By default, the port for publishing a 4D Server is 19813, in which case it is not necessary to specify it in the network address. However, especially when several servers are run simultaneously on the same machine, this port may have changed in the Database Properties (see Network and Client-Server options section). In this case, the address must be followed by a colon and port number, for example: 192.168.92.104:19814 (IPv4 format) or [2001:0db8:0000:85a3:0000:0000:ac1f:8001]:19814 (IPv6 format).
Note: If a database was selected in the Recent or Available tabs at the moment that you clicked on the Custom tab, the two fields display the corresponding information.
Once this tab assigns a server, click the OK button will allow you to connect to the server. The server will then be listed in the Recent tab.
Note: If the database is published using the encryption option, you must add a circumflex accent (^) before the name; otherwise the connection will be refused. For more information, refer to section Encrypting Client/Server Connections.
This option allows you to connect in development mode to an interpreted project open on 4D Server. In this mode:
- project files are available in read/write so that you can edit methods, forms, etc.
- several remote 4D can concurrently open the same interpreted project files and edit them: just like with a binary database, an automatic locking system prevents from concurrent access to the same resource,
- modifications are made available to all remote developers. Note however that, unlike with a binary database, there is no automatic push to remote developers, they need to refresh to get latest versions of files (a refresh is done each time the developer switches from design to application mode for example, or selects Save all from the File menu).
When you check this option, you are prompted to Select 4D project file: you need to select the .project file that 4D Server has opened. If you select a different file, an alert dialog box warns you that the development mode is not available. It means that the remote 4D must have access to the project folder over the network (the whole project folder must be shared, i.e. the root folder of the project).
Warning: For performance reasons with this configuration, it is strongly recommended that the project folder be stored on a dedicated file server (e.g. a NAS) on a local network.
Note: When both the server and the remote 4D are on the same machine, additional rules applies. See this page on developer.4d.com.
Here is an overview of the development mode architecture:
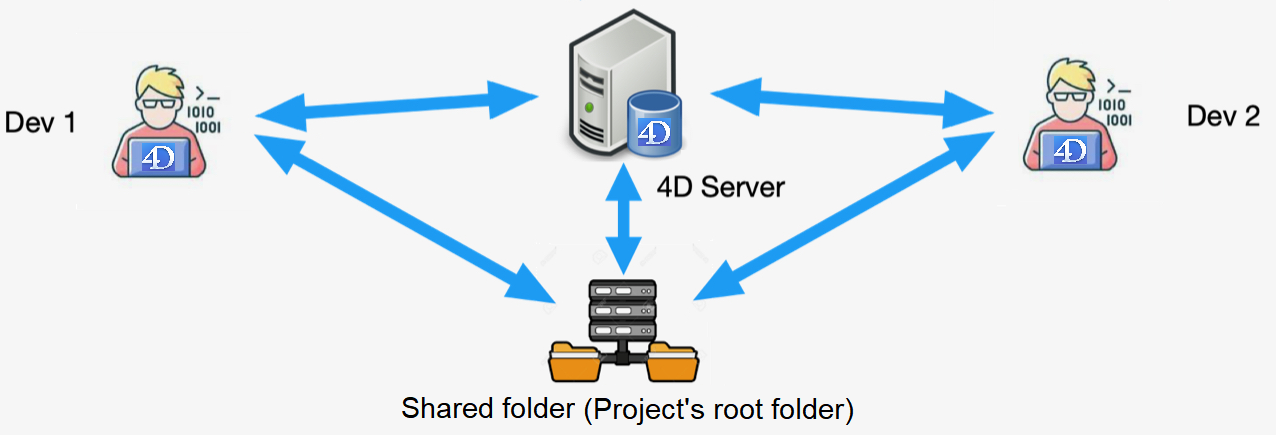
Compatibility: This feature is designed for development teams who are used to work on binary databases and want to benefit from project features while maintaining their current organisation. However, for multi-user development on 4D projects, we recommend using a standard architecture where developers work on their machine and manage their work using source control repository tools (Git, SVN, etc.). This organisation provides a great flexibility by allowing developers to work on different branches, and compare, merge, or revert modifications.
This option causes systematic updating of the local resources on the client machine when it connects. The local resources are the structural information related to the database that are stored on each client machine.
As a rule, updating of the local resources is automatic on the remote machine each time it connects, when the structure of the database has been modified between two connections. Most of the time, this option is unnecessary. Nevertheless, in certain specific cases, it may be necessary to force the update.
The Open Recent Databases menu command can be used to connect directly to a 4D Server database to which you have already connected previously.
This command is found in the 4D File menu. If you use the 4D application to open local databases and to connect to remote datatabases, this menu will list both types of databases. The remote databases are placed at the bottom of the menu:
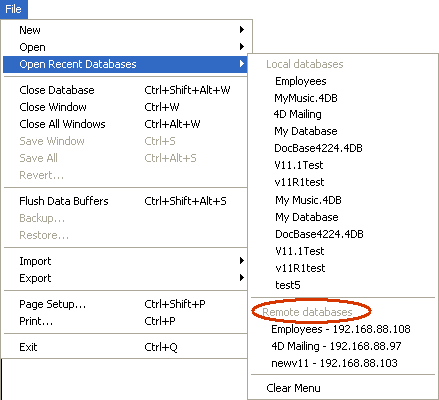
The Clear Menu command can be used to reset the menu.
You can generate database access files containing parameters intended to automate and simplify opening or connecting to 4D databases. Usually, an access file can save the address of a 4D Server remote database as well as its connection identifiers, thus eliminating several operations for the user.
Access files can also be used for opening local databases.
A .4DLink access file can be used to launch the 4D application and open the target 4D database. There are two different ways to use it:
- Via a double-click or drag and drop onto the 4D application,
- Via the Open Recent Databases submenu (file located in the local preferences folder).
A .4DLink file of the "remote database" type can be copied and used on several different machine. - By selecting a 4DLink file in the 4D and 4D Server opening dialog box (opening local databases only).
- By passing a 4DLink file path to the --structure parameter in a Command Line Interface instruction.
The access files of 4D databases are XML files that have the ".4DLink" extension. 4D generates and uses this type of file to build the "recent databases" submenu: a .4DLink file is automatically generated by 4D when a local database is opened for the first time or when connecting to a server for the first time.
The .4DLink files that are created automatically by 4D are placed in the local preferences folder of the user. In this folder, two directories are created: Local and Remote. The Local folder contains the ".4DLink" files that can be used to connect to local databases and the Remote folder contains the "4DLink" files that can be used to connect to remote databases.
Local preferences folders are found at the following locations:
- Windows 7 and higher: C:\Users\UserName\AppData\Roaming\4D\Favorites vXX\
- OS X: Users/UserName/Library/Application Support/4D/Favorites vXX/
... where XX represents the version number of the application (for example, "Favorites v14" for 4D v14).
The files found in these directories are displayed by 4D in the Open Recent Databases> submenu of the File menu:
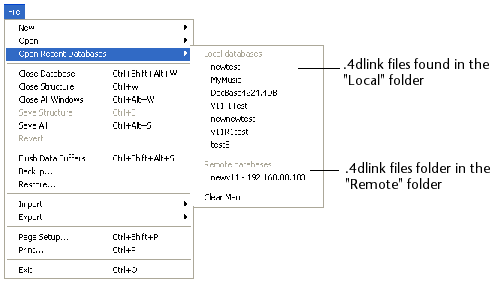
The ".4DLink" files can also be created with an XML editor and contain customized information such as the connection identifiers (user name and password) or the database opening mode.
4D provides a DTD describing the XML keys that can be used to build a ".4DLink" file. This DTD is named database_link.dtd and is found in the \Resources\DTD\ subfolder of the 4D application.

Product: 4D
Theme: Using a remote 4D
Modified: 4D v16 R4
Modified: 4D v19 R6
4DLink file, 4DLink, .4DLink
4D Server Reference ( 4D v20 R7)


